Last updated:
AI Space Planning at Department-Level: Design the Bubble Diagram That Actually Connects to BIM
TL;DR: Snaptrude's department-level space planning lets you design the bubble diagram first, as actual BIM objects with real areas and adjacency relationships. Plan major program zones, use AI to pack them based on adjacencies, then drill into individual spaces when you're ready. Big decisions before small ones. Departments before rooms. And everything stays connected: change one level, the other updates automatically.
Most BIM software forces you to design at the room level from day one.
Place every wall. Define every door. Model every space individually. Even when you're still figuring out the big moves: does the office zone go near the gallery, or on a different floor? How much space does the student services department need total?
But that's not how architects think early on.
You start with department relationships. You think in zones, clusters, functional groupings. You sketch bubble diagrams showing how major program areas relate to each other. Only later do you drill down into individual rooms.
Snaptrude's department-level space planning respects this workflow. Design the bubble diagram first, as actual spatial masses with real areas and relationships. Then, when you're ready, drill into room-level detail.
By the Numbers
- 62% of architecture professionals say AI tools are not yet ready for full production use, but early-stage spatial planning is exactly where AI delivers immediate value
- Most generative AI tools for architecture map only onto the early conceptual design stage, not production workflows: department-level planning is that stage
- Only 27% of AEC firms currently use AI in their operations, leaving early-stage design as the most underserved part of the architectural workflow
The Two-Level Hierarchy
Here's how it works:
1. Department Level (The Big Moves)
A department is a mass representing the total area of all spaces within that functional group. Examples:
- Office Department: 12,000 SF total (includes private offices, open workspace, collaboration zones)
- Student Services Department: 8,500 SF total (includes advising, lounge, game room, study spaces)
- Public/Gallery Department: 6,000 SF total (includes main gallery, entry, restrooms)
At this level, you're not defining individual rooms yet. You're defining major program zones and their relationships. Should the office zone be adjacent to the gallery, or separated? Should student services connect directly to the public zone?
You drag department masses around. You snap them together to indicate adjacency. You split a department if it should span multiple floors. You resize based on program constraints.
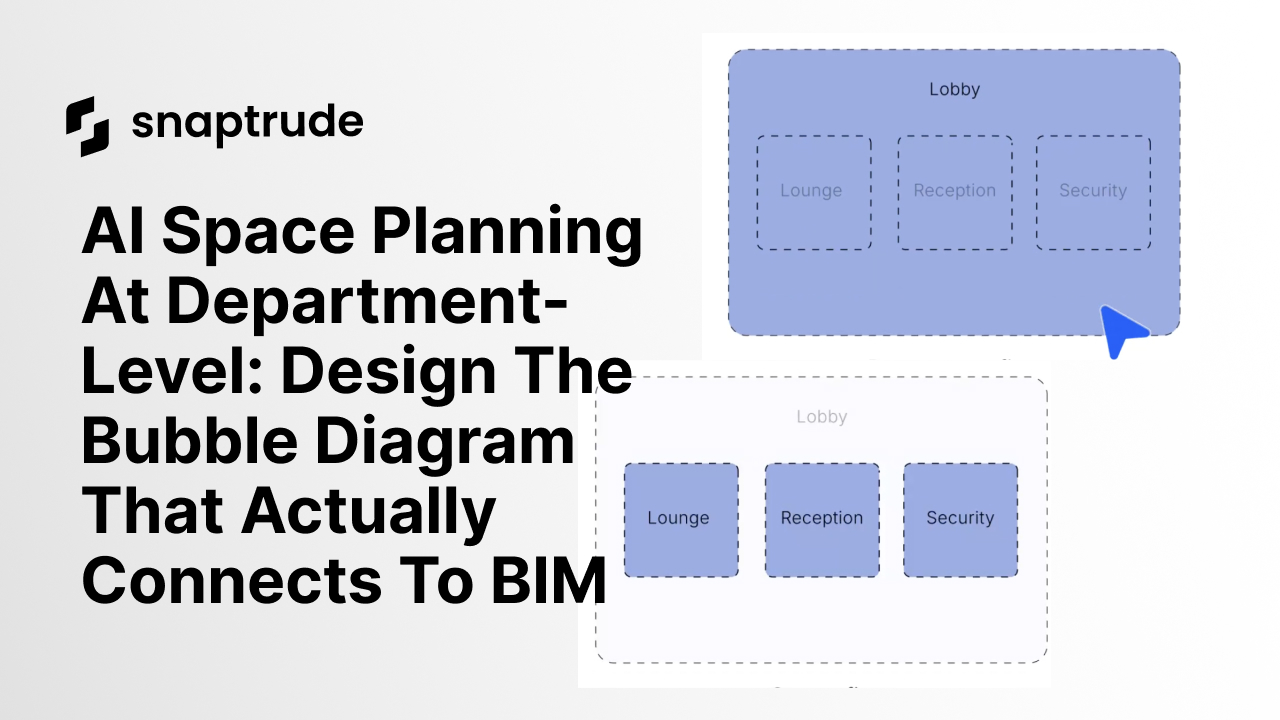
This is the bubble diagram, but it's not just a sketch. It has real data. Areas, proportions, relationships. And it's directly connected to the BIM model.
2. Space Level (The Detail)
Once you've planned the departments, you drill down. Each department contains individual spaces:
- Office Department: Private offices (8), open workspace (1), small meeting rooms (4), collaboration zone (1)
- Student Services: Advising offices (6), student lounge (1), game room (1), study rooms (4)
At this level, you're defining the actual rooms. Placing them within their parent department. Using AI Adjacencies to pack them efficiently. Refining manually to match design intent.
The key: department area = sum of space areas. Change either level, the other updates. Add a room to a department, the department mass resizes. Shrink a department, the spaces inside adjust proportionally.
Traditional Bubble Diagrams vs. Snaptrude Department-Level Planning
| Traditional Bubble Diagram | Snaptrude Department Planning | |
|---|---|---|
| Medium | Sketch, whiteboard, or static diagram | Live BIM objects with real area data |
| Connected to model | No | Yes: changes propagate instantly |
| AI adjacency optimization | No | Yes: at both department and space level |
| Bidirectional sync | No | Yes: departments and spaces stay in sync |
| Drill into room detail | No: separate process required | Yes: same model, different zoom level |
| Client presentation ready | Needs separate rendering | Yes: spatial masses with real proportions |
| LOD progression | No | Yes: department to space to wall level |
Try Snaptrude free: Start with department-level planning on your next project →
The Workflow
Here's what this looks like in practice:
Step 1: Plan Departments First
You have a client program. Total building: 30,000 SF across 5 departments. You create department-level masses:
- Office: 12,000 SF
- Student Services: 8,500 SF
- Gallery/Public: 6,000 SF
- Services/Mechanical: 2,500 SF
- Circulation (added by AI): 1,000 SF
You arrange them on the site. Office near the entry. Gallery visible from the street. Services separated from public zones. Student services adjacent to both office and gallery.
You use AI Adjacencies at the department level. You select departments, compute relationships, visualize them as orange connection lines. You edit the connections: office should connect to gallery, but services should not. You hit "pack," and the algorithm arranges departments to satisfy adjacency constraints while minimizing circulation.
You now have a spatial layout of major program zones. No individual rooms yet. Just the big moves.
Step 2: Drill Into Spaces
You pick the Office Department. You drill down into space-level view. You define the individual spaces:
- Private offices: 8 rooms, 150 SF each
- Open workspace: 1 space, 6,000 SF
- Small meeting rooms: 4 rooms, 200 SF each
- Collaboration zone: 1 space, 1,200 SF
Total: 12,000 SF (matches the department mass).
You use AI Adjacencies at the space level. You specify that private offices should be near the open workspace, meeting rooms near collaboration zones. You pack, and the algorithm arranges spaces within the department boundary.
You repeat for each department. Student Services. Gallery. Services. Each department gets detailed with individual spaces, each packed with AI assistance, each manually refined as needed.
Step 3: Iterate Between Levels
The client decides the Office Department should be smaller: 10,000 SF instead of 12,000 SF. You adjust the department mass.
The spaces inside shrink proportionally. Or you remove two private offices to hit the target. Either way, the department and its spaces stay in sync.
Alternatively, you add a new space inside Student Services, a tutoring room, 800 SF. The Student Services department mass automatically grows to accommodate it.
This is progressive refinement. Big decisions before small ones. Departments before rooms. Proportions before precision.
How the Packing Algorithm Optimizes Layouts
Snaptrude's AI Adjacencies algorithm optimizes across four objectives simultaneously:
ObjectiveWhat It DoesAdjacency ComplianceMinimizes distance between connected spaces — adjacent rooms touch or share a wallCirculation EfficiencyReduces hallway area needed to connect all spaces; compact shared-wall layouts beat sprawling onesProportional SizingMaintains required area per space while keeping shapes reasonable and buildableBoundary ConstraintsRespects department zones and floor assignments throughout the packing process
The algorithm runs multiple iterations simultaneously, scores each configuration against all four objectives, and returns the highest-scoring layout.
AI Adjacencies vs. Manual Space Planning
The algorithm doesn't replace design judgment. It replaces the tedious, error-prone trial-and-error of satisfying spatial constraints by hand.
Related: What is LOD in BIM? A Complete Guide →
Why This Matters
Most BIM workflows force premature detail. You model individual rooms from the start, even when you're still testing whether the program fits the site, whether the adjacencies make sense, whether the client's priorities have shifted.
That early commitment is expensive. Every time you pivot the layout, you're reconstructing walls, repositioning doors, regenerating schedules. You're fighting the tool's preference for precision when you still need flexibility.
Department-level planning inverts this. You design the bubble diagram first, as actual BIM objects with real data. You test layouts, show clients, get feedback, all without committing to individual room boundaries.
Then, when the big moves are solid, you drill into detail. The spaces you define are constrained by their parent departments. The adjacencies you specify are relative to other spaces within the same zone. You're designing within a framework, not from scratch.
And because it's all connected: departments to spaces, spaces to areas, areas to program. Changes propagate instantly. Update the program spreadsheet, departments resize. Move a department, its spaces move with it. Add a space, the department grows.
One model. Multiple levels of detail. Seamless transitions.
Real Use Cases
Early Client Presentations
You're presenting three site options to a client. You don't have time to model every room for every option. Instead, you plan departments for each site. Office here, gallery there, student services on the second floor. You show spatial relationships and proportions, enough for the client to choose a direction, without detailing 80 individual rooms.
Testing Program Fit
The client's program is 30,000 SF, but the site only supports 25,000 SF. You model departments to see what fits. Gallery and office on the ground floor, student services on the second floor, mechanical in the basement. You show the client: "This is what fits. Which department do we reduce?"
Phased Design Development
Your firm works in stages. Pre-schematic: department-level planning. Schematic: space-level layout. Design development: wall-level detail. With Snaptrude, you work at the appropriate level for each phase, and carry data forward when you move to the next.
How It Works Technically
Snaptrude's department-level planning is built on a hierarchical data model:
- Department = container with total area
- Spaces = children with individual areas
- Department area = sum of child space areas (enforced automatically)
When you edit at either level, Snaptrude recalculates the hierarchy:
- Change department area: spaces resize proportionally (or prompt to add/remove spaces)
- Change space area: department area updates to match sum
- Add space to department: department grows
- Remove space from department: department shrinks
The AI Adjacencies algorithm works at both levels:
- Department-level adjacencies: optimize major program zone relationships
- Space-level adjacencies: optimize room layouts within each department
You can run AI packing at the department level first (big moves), then at the space level within each department (detailed layout).
FAQs

