How to Import Revit Rooms Without Rework: The Pre-Design Tool That Doesn't Make You Start Over
.jpg)
Most pre-design tools require you to start from scratch, making them poorly suited for renovation and adaptive reuse work (70% of architecture projects). Snaptrude's Revit room import brings existing building data in as editable geometry: walls stay parametric walls, rooms retain parameters, and curved geometry stays intact. You can import existing Revit facilities, layer in new program requirements, and see both simultaneously in one model. Export back to Revit as native .rvt files with parameters preserved, maintaining workflow continuity from existing conditions through proposed design.
By the Numbers: The Scale of Renovation Work
70% of architecture projects involve renovation or adaptive reuse rather than new construction (industry estimates, 2025)
20% reduction in project timelines and 15% reduction in costs reported from BIM adoption (Pinnacle Infotech BIM Adoption Report, 2025)
48% of all construction rework is driven by poor collaboration and version conflicts between teams (PlanGrid / Autodesk research)
9 to 20% of total project costs can be lost to rework, most of it preventable at the design phase (ASCE, 2026)
The Problem With Starting Over
Most pre-design tools have a structural flaw: they require you to start from scratch.
You model your concept in the new tool, explore options, finalize a direction, and then rebuild it in Revit for schematic design. The geometry does not carry over as Revit-native walls and floors. The room data does not translate. You use the tool as a visualization step, not as part of a continuous design workflow.
For greenfield projects, that is inconvenient.
For renovation and adaptive reuse work (which represents roughly 70% of architecture projects), it is a broken workflow.
Renovation projects do not start from zero. They start from existing buildings with spatial logic, structure, and constraints. You are not designing a building: you are transforming one.
What Revit Room Import Actually Does
Snaptrude's Revit import does something different from most pre-design tools.
It brings existing building data in as live, editable design geometry, not as a static underlay.
When you import a Revit file, walls come in as parametric walls: not just lines you are tracing over, but walls you can select, modify, and design from. Rooms retain their names and areas. Custom Revit parameters carry over as Snaptrude tags and are preserved through the workflow. Curved and arc walls keep their geometry intact.
The result is not a flattened reference. It is the building itself, made available as a design object.
Why This Matters for Healthcare and Institutional Work
A recent demo with a healthcare architecture firm illustrated the problem clearly.
They work on hospital renovations and campus expansions.
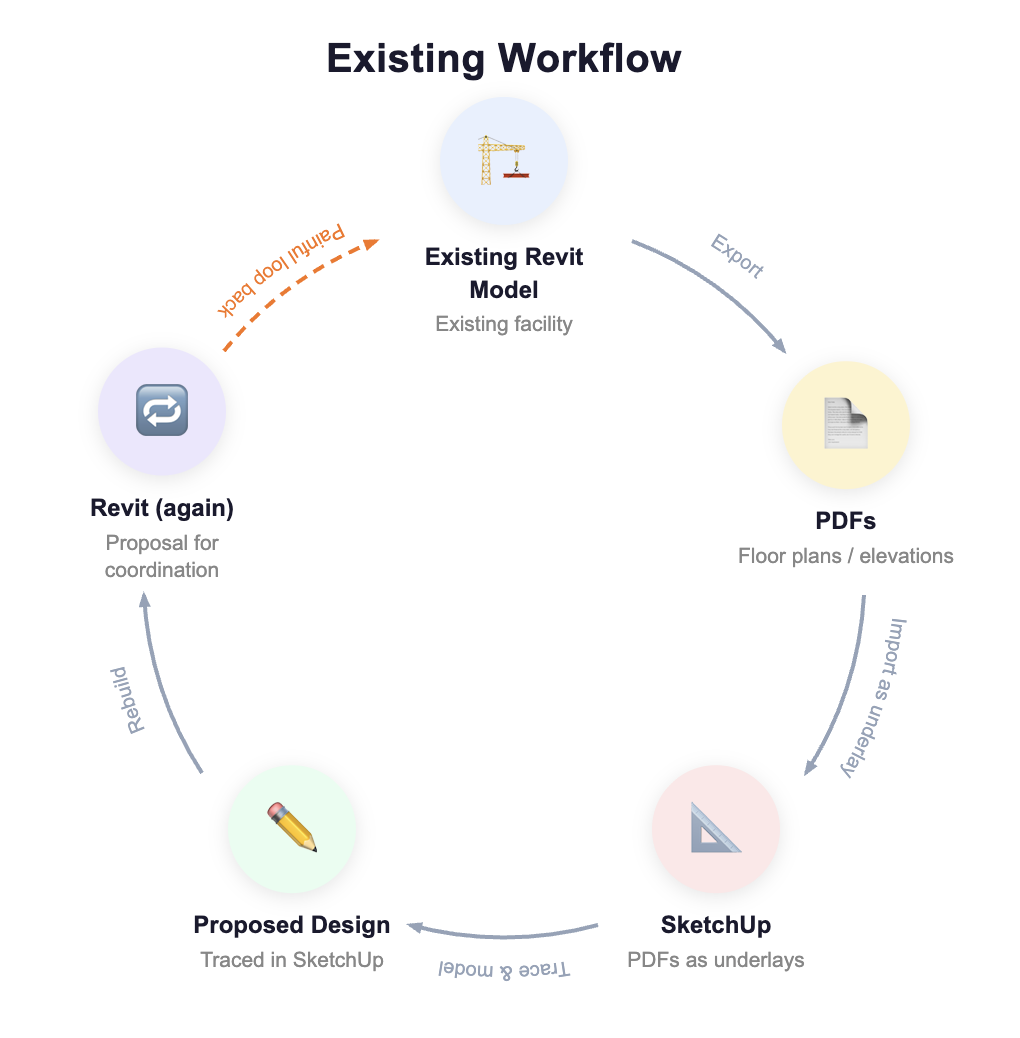
Their existing workflow: start with a Revit model of the existing facility, export PDFs, bring those PDFs into SketchUp as underlays, trace over them to model the proposed design, and then rebuild the proposal in Revit for coordination.
Three tools. Two redraws. And the existing building data, stripped out at each step.
When shown Revit room import, the reaction was immediate:
"So if I have existing facilities, I can bring them through Revit files or even PDFs and trace over them? And the rooms stay as rooms, not just geometry?"
Yes. The parameters come with them. And when you add new program requirements, you can see both at the same time: existing and proposed, in one model.
They had been doing this workflow for years in fragmented tools, with constant redrawing and reconciliation. The workflow they described is not unusual. It is standard practice.
Why This Matters for Adaptive Reuse
Adaptive reuse is one of the fastest-growing sectors in architecture. Cities are repurposing office buildings into housing, converting retail into mixed-use, transforming industrial spaces into creative offices.
The design challenge in adaptive reuse is understanding the delta: what is changing, what is staying, and how the new program fits into the old structure.
If your design tool treats the existing building as a reference image, you are constantly doing mental translation. The existing building has 200 rooms totaling 80,000 square feet. The new program requires 180 rooms at 85,000 square feet. Which rooms reuse, which reconfigure, which combine? That analysis is difficult when the existing building is a background image rather than a live spatial object.
When the existing building is imported as parametric geometry, you can see immediately where new program requirements align with existing spaces and where they conflict. The building is the starting point you are designing from, not a static backdrop.
How Export Back to Revit Works
The import is only half of what makes the workflow continuous.
When design work is complete in Snaptrude, the model exports back to Revit as a native .rvt file: parametric walls with correct assemblies, rooms with names and parameters, levels and grids intact. Custom parameters that came in from the original Revit model carry back out.
This matters particularly for renovation projects where existing room data (occupancy codes, fixture counts, department assignments) has to stay connected to the geometry through the full workflow. In a fragmented three-tool process, that data gets stripped and has to be re-entered at each handoff. In a continuous workflow, it stays.
The Workflow That Stays Continuous
The standard renovation workflow in most firms looks like this: Revit model in, geometry stripped out, redrawn as SketchUp underlay, proposed design modeled on top, redrawn again in Revit for documentation.
Snaptrude collapses that to: Revit model in, design in Snaptrude with both existing and proposed geometry live, Revit model out. Same parameters from start to finish. No redrawing. No data re-entry.
The pre-design tool that makes you start over is not saving you time: it is just moving the rebuild cost to a later phase, when changes are more expensive.

